About the items in this Website.
As you can see by the number of categories on the home page, I make a large range of unique hand crafted pieces. There are still quite a few different items to come, such as Darts, Shaving Brushes and razors, Fire Starters, Seam Rippers, and Coffee & Ice cream Scoops. Pens are the most popular and they come in a great array of styles and finishes. They are available in Gold, Silver, Black Gold, Rhodium and Black Chrome. Movements range from twist mechanism & click type, with delivery methods of standard Ball point, Roller Ball and Fountains. Most items including the pens can be made in many finishes.
I personally use Australian Hardwoods when available and Polyester Resin. Some of the resin blanks I get from various supplies and some I make myself. I have started setting my own Resin and while the outcome is not quite the same as the blanks from the suppliers, when turned and polished they look as good if not better as they are “very” original. Virtually no two items are ever the same. I will keep adding new items to the site until I run out of ideas.
How Hand Crafted Pens Are Made


First thing is to select the material….wood or polyester resin. There are other materials that can be used such as Corian or bone plus many more. Not all woods are suitable for making pens from. It depends on the grain…generally darker dense wood with good grain figure give the best results.
The source of my wood is many and varied…Some from my own garden, some from the woodworking club I belong to and my suppliers have a great range of wood types that can be purchased at a reasonable cost.

First thing to do, prepare the blanks. These can be cut from any suitable piece of wood, they are cut down to lengths of about 125mm (5 inches) and about 20mm (¾ inches) square. They are then marked so the grain pattern stays in the same orientation and therefore matches up when completed.
These are cut about 2mm longer than the brass tubes. Some pens have only one tube, which is generally a little longer than the tubes of pens that are made with two sections.

Drill & Set Tubes
With specially designed chucks I mount my blanks on the lathe and using a drill chuck on the tailstock end and slowly drill the hole down the centre for the tube, a large percentage of pens use a 7mm drill but sizes vary as the variety of pens that can be made is very extensive.

I then rough sand the brass tube so the glue grips a little better and then use CA (super glue) to set the tubes in the drilled blanks.


Square Ends
The ends are then squared on my disk sander, sanding down very carefully until the end of the brass tube just shows that it has been touched by the sander.


Set Up on Turning Mandrel
The tubes (either one or two) are the set up on a turning mandrel spaced with bushes the size required to fit the pen fittings and a little room at each end of the tube(s) to allow for tool work. Then this is put into the head of the lathe and the tailstock is brought up very gently to hold the end of the mandrel from moving.


Turn Shape
The pen is then carefully turned down to the shape required. Many shapes can be achieved but I personally like the straighter style.


Sand & Polish
Sanding generally starts at grit of about 120 or finer if the turning finish is of good quality. I sand down to about 800 grit with sandpaper and then use the new “Micro Mesh” to sand to unbelievable 12000 grit when making the pens from Polyester resin. This gives a beautiful finish on the polyester resin.
As for the finish applied to the wood pens…..this sometimes varies, but CA (super glue) is excellent then buffing with Car polish or even Brasso and then on cotton buffing wheels to give a high lustre.
Finally I use Renaissance Wax to complete the job.

Assemble
I have a pen press to assemble the parts which is a very controlled way of putting the bits together, you can also assemble the parts using your vice or any other method that you are comfortable with.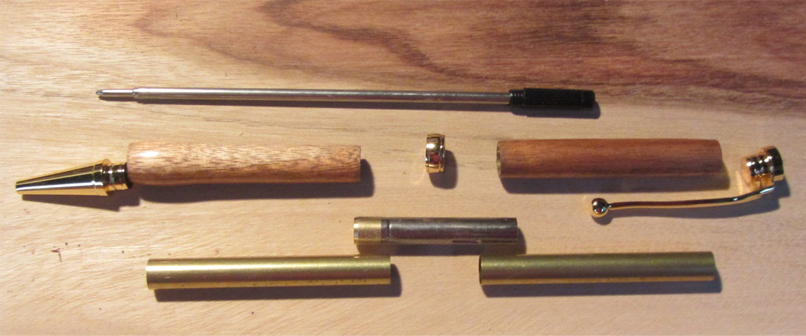
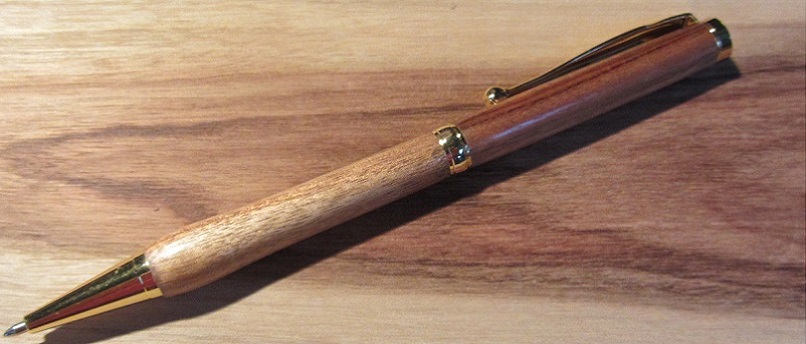
You then finish up with a beautiful writing instrument, unique and hand crafted.
I have done demonstrations whereby at the end I will give the pen to a spectator and they are generally over whelmed by the fact that they now own a pen that they actually saw being handcrafted.

About David from Aussie Pens n Things
![]() Aussiepens “n” Things remains a family business owned by David and Christiane who have owned/operated online businesses for over 15 years. We live in Tewantin on the Sunshine Coast in Queensland.
Aussiepens “n” Things remains a family business owned by David and Christiane who have owned/operated online businesses for over 15 years. We live in Tewantin on the Sunshine Coast in Queensland.
David has had an interest in woodturning for many years. His first lathe was purchased in the early 80’s a Durden L500, where his main interest was turning plates, bowls and a few spindle turning projects. In the late 90’s David attended a wood turner’s course that specialised in spindle turning, particularly the use of the skew chisel and since his retirements from fulltime employment (as an engineer) a few years ago has turned many interesting items. His passion for woodworking has come from both grandfathers and a father who started making pens in the 1980s, with one of the early Carbatec pen lathes.
David has been making and selling pens since retirement on various websites and added Aussiepens “n” Things to what we do.
David’s pens are made much in the same was as before and many of Graham’s pens are still available and new stock will be added.
The new pens are handcrafted in the workshop, by me, one at a time. The uniqueness of the raw materials is wonderful – natural wood and man-made acrylics and resins.
We aim to acquire our wood from sustainable sources.
We hope you appreciate our pens and other items at Aussiepens “n” Things as much as we enjoyed making them.
Be sure to check out the “Pen Design Studio” and order the pen that really works for you or a special gift to a friend!
David Nivala
